A website’s aesthetic appeal can significantly affect the user experience and, consequently, the site’s success. To create visually appealing and user-friendly websites, designers meticulously fine-tune each element, including hyperlinks. By default, these hyperlinks usually feature an underline, but the specific requirements of your website design may lead you to remove these.
This article serves as a comprehensive guide on how to remove underlines from links in WordPress.
Why Removing Underlines Requires Extra Steps
To begin, it’s crucial to understand the role of pseudo-classes in hyperlinks. Pseudo-classes are distinct states of an element that change based on user interaction. The four pseudo-classes for hyperlinks are:
a:link: Represents a link that the user has not interacted with.a:visited: Represents a link that the user has previously visited.a:hover: Represents a link the user is currently hovering over with their cursor.a:active: Represents a link the user is actively clicking on.
By default, underlines appear on links in all four pseudo-classes. Like this:

How to Remove Underlines from Links in WordPress (Easy Guide)
Having understood the pseudo-classes, let’s delve into how to remove underlines from hyperlinks using CSS in WordPress. The text-decoration CSS property is instrumental to this process. Follow this simple guide:
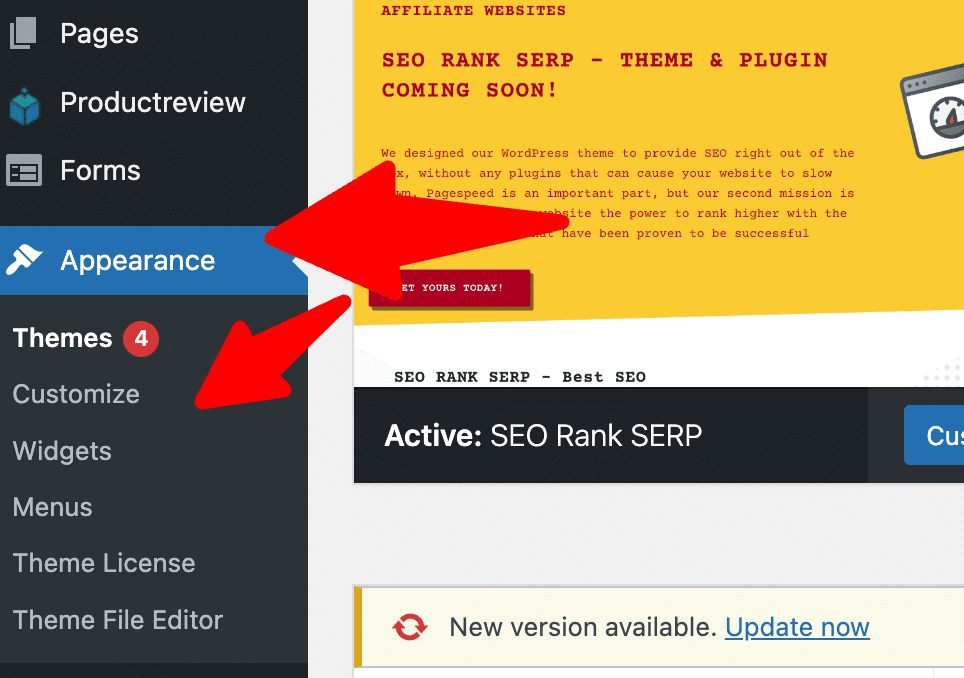
Step 1: Access Theme Customizer
Start by logging into your WordPress Dashboard. Navigate to ‘Appearance’ and then select ‘Customize’. This will lead you to the ‘Theme Customizer’.

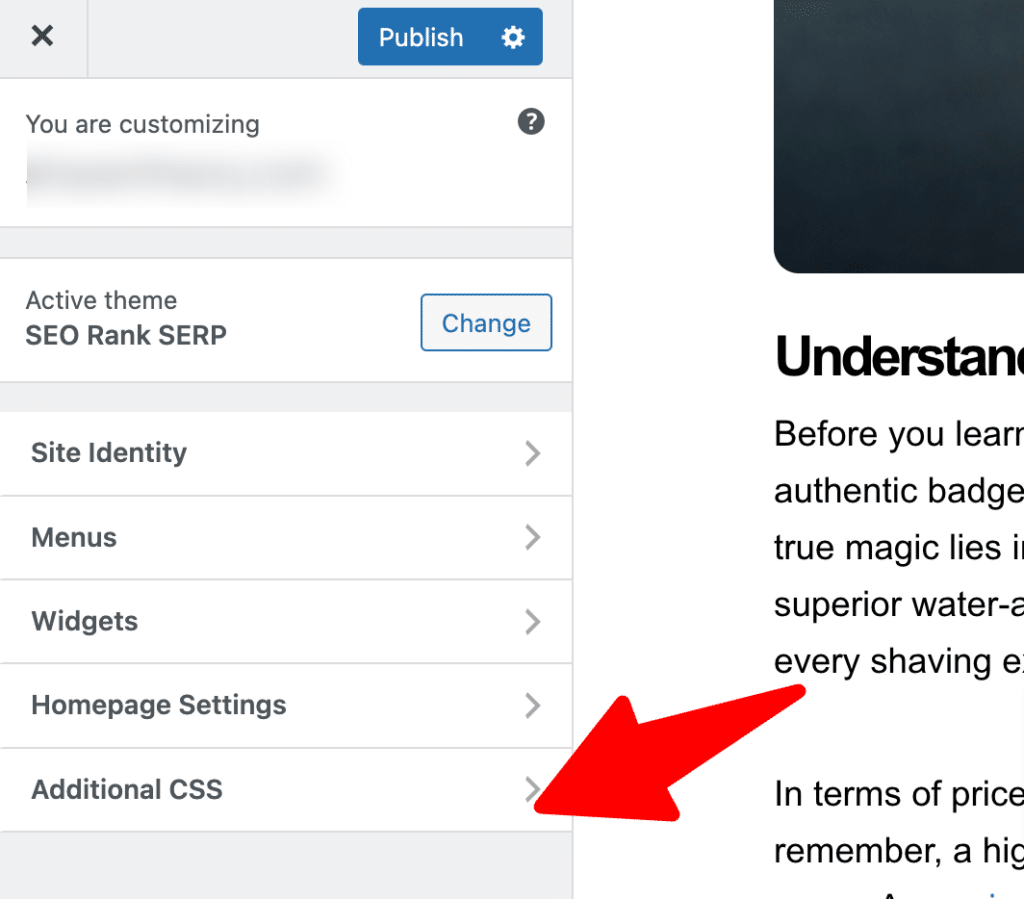
Step 2: Navigate to Additional CSS
In the ‘Theme Customizer’, locate ‘Additional CSS’ — this is where you’ll input your custom CSS.

Step 3: Input Custom CSS
In the ‘Additional CSS’ field, define the four pseudo-classes for hyperlinks and assign the text-decoration property to each. Be mindful of the order: a:link and a:visited should precede a:hover, with a:active coming last. Set the text-decoration property value to “none” for each pseudo-class.

Here is how your CSS should look:
a:link { text-decoration: none; }
a:visited { text-decoration: none; }
a:hover { text-decoration: none; }
a:active { text-decoration: none; }
Step 4: Publish Changes
After inputting the CSS, click on ‘Publish’. This action will save your changes and update your website.
Step 5: Verify the Changes
Finally, visit your website and hover over any hyperlink. The links should now appear without an underline in all states.
Theme Issues? How to Remove Link Underlines When the Usual Tricks Fail
Different WordPress themes have unique stylesheets (CSS files) that control the look and feel of your website, including how links are displayed. If the standard steps for removing underlines haven’t worked, it’s likely because your theme’s stylesheet is overriding the changes you made in the Additional CSS section.
Here’s how to troubleshoot and solve this:
1. Identify the CSS Classes or IDs Used for Links:
- Inspect Element: Right-click on a link in your website and choose “Inspect” or “Inspect Element” (depending on your browser). This will open up your browser’s developer tools. Look for the CSS classes or IDs associated with the link element (usually elements like
<a>,<span>, or even<div>depending on your theme’s structure).

- Check Your Theme’s Stylesheet: If you’re comfortable with code, you can directly access your theme’s stylesheet. In your WordPress dashboard, go to Appearance -> Theme Editor. Look for the file named
style.css. Search for the classes or IDs you found using Inspect Element.
2. Modify Your CSS:
Once you’ve identified the relevant classes or IDs, you have a few options:
- Override with More Specific CSS:
- In your Additional CSS section, write a new rule that targets the specific class or ID you found. Use the same
text-decoration: none;property, but make sure your rule is more specific. For example:
- In your Additional CSS section, write a new rule that targets the specific class or ID you found. Use the same
.my-theme-link-class a:link,
.my-theme-link-class a:visited,
.my-theme-link-class a:hover,
.my-theme-link-class a:active {
    text-decoration: none;
}
(Replace .my-theme-link-class with the actual class or ID from your theme)
a:link, a:visited, a:hover, a:active {
    text-decoration: none !important;
}
- Edit Your Theme’s Stylesheet Directly (Advanced):
- If you’re comfortable editing CSS files, you can find the link styles in your theme’s
style.cssand remove the underline properties there. Always make a backup of your originalstyle.cssfile before making any changes.
- If you’re comfortable editing CSS files, you can find the link styles in your theme’s
3. Test and Refine:
- Save your changes and refresh your website to see if the underlines have disappeared.
- If not, double-check your CSS selectors to ensure they’re targeting the correct elements.
Faster and Alternative Method, Using Linkilo
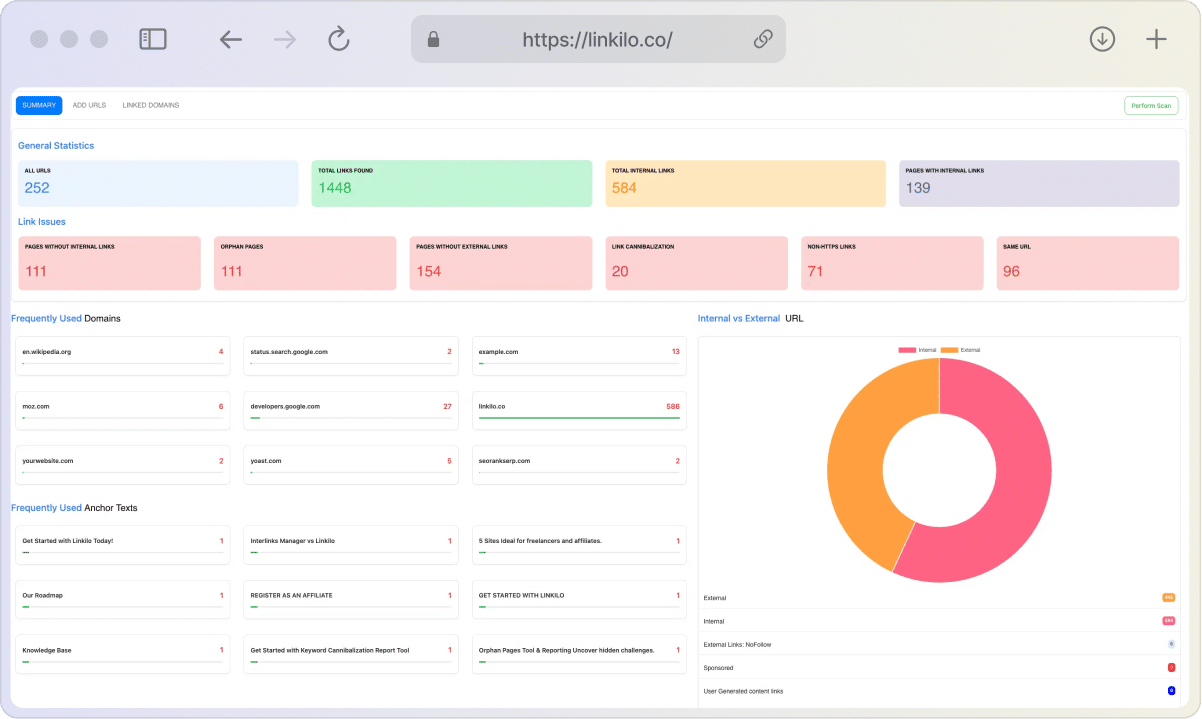
Linkilo isn’t just about making your links look pretty (though it totally does that too). It’s like a personal assistant for your internal linking strategy.
Wanna give those links a serious glow-up? Throw in some cool icons, make those internal and external links pop with bold text or custom colors, and ditch the boring underlines. You can even get fancy with CSS classes if you’re feeling adventurous.
But Linkilo goes beyond design—it’s got your back with smart link suggestions, helps you analyze anchor text, and even spots those lonely orphan pages and link cannibalization issues. Trust me, your links (and your SEO) will thank you!

Final Thoughts
The ability to manipulate hyperlinks’ appearance is an exemplification of the control CSS offers to web designers. By mastering CSS, you can refine every aspect of your website, delivering a seamless user experience. Removing the underline from hyperlinks is a simple yet impactful modification that even novice developers can easily achieve.
Armed with the insights from this guide, you should feel confident to experiment with different styles and effects in WordPress. The digital world is your canvas—unleash your creativity and enhance your site’s aesthetics using CSS!


